


Nowadays, data access speed on Virtual Private Server (VPS) systems plays a crucial role. An efficiently performing disk can make your applications run more smoothly, improve page load times, and enhance the user experience. One of the tools you can use to measure disk performance on Ubuntu 20.04 is the hdparm Command. In this article, VPSWindows will guide you on how to measure disk speed on Ubuntu 20.04 VPS using the hdparm command.
Introduction to hdparm
What is hdparm?
hdparm is a command-line utility used to interact with PATA/SATA (ATA/ATAPI) hardware devices on Linux systems. This command allows you to display or configure various parameters of hard drives, including performing read/write performance tests. System administrators often use hdparm to quickly check disk speed or tuning performance, and power management settings on their drives.
Why Use hdparm to Measure Disk Speed?
When evaluating the performance of a disk on a VPS, hdparm stands out as a top choice for several key reasons:
Simple and Easy to Use
hdparm command stands out for its concise and easy-to-understand command syntax. You don’t need to be a Linux expert to use it — with just a few simple parameters, you can quickly gather important information about your disk’s read performance. This is especially useful when you need to run a quick check without spending time on complicated configurations.
Accurate and Reliable
The quality and accuracy of hdparm are often highly rated by users. The measurement results obtained from the hdparm command closely reflect real-world performance, giving system administrators a more realistic view of disk efficiency. Because hdparm interacts directly with the disk driver, it can read information about both cache speed and direct disk read speed. These results are often used as basic reference indicators for a system’s I/O performance.
This reliability also helps you quickly detect potential disk issues, such as bad sectors or hardware failures, before they become critical problems.
Ability to Check Multiple Aspects
hdparm command doesn’t just measure read speed — it also allows you to test various other aspects, such as write speed, random access speed, and many additional parameters depending on your needs.
This flexibility gives administrators a comprehensive overview of the disk’s operational status, helping them identify issues early and take corrective actions when necessary.
Available on Most Linux Systems
Thanks to its high compatibility, hdparm command can run on almost every Linux distribution. This means you can easily equip your system with this tool regardless of which Linux version you’re using. On Ubuntu 20.04, hdparm is already included in the default package repositories, making installation quick and easier than ever.
How to Measure Disk Speed on Ubuntu 20.04 VPS Using the hdparm Command
Identify the Disk to Test
Before measuring disk speed, you need to know the device name of your disk. In Linux, disks are usually named like /dev/sda or /dev/nvme0n1. On most VPS setups, there’s typically only one main disk.
You can use the lsblk command to list block devices and identify the root disk (not the partitions):
lsblk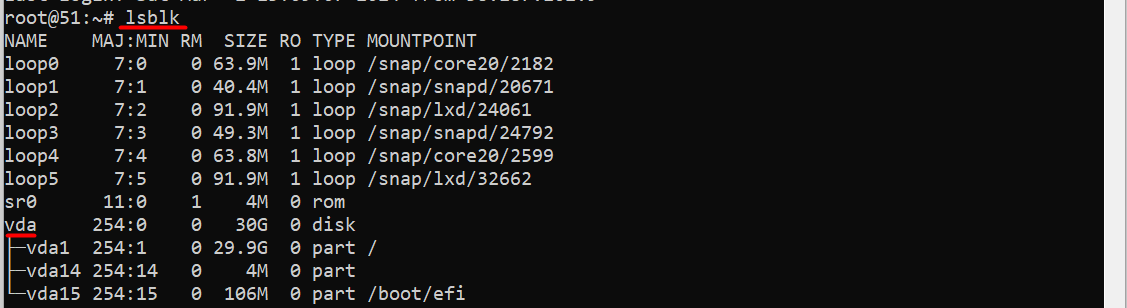
Install hdparm on Ubuntu
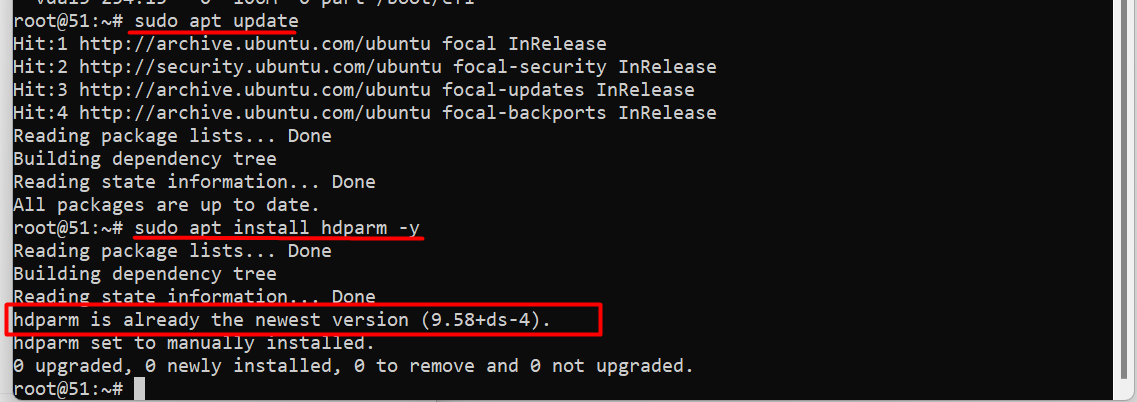
Log in to your Ubuntu 20.04 VPS. If hdparm is not already installed on your system, open the terminal and run:
sudo apt updatesudo apt install hdparm -yIn this context:
- sudo apt update: Updates the package list to ensure you have the latest information about available packages.
- sudo apt install hdparm -y: Installs the hdparm package.
Measure Disk Read Speed
Once you’ve identified the disk, you can use the hdparm command to measure the disk’s read speed. The syntax for performing the test is:
sudo hdparm -Tt /dev/sda
Explanation of the Parameters
To better understand the results, let’s take a look at what the parameters and the output lines mean:
T: Tests the disk’s cache speed.
The -T (uppercase T) option measures the read speed from the system’s cache (RAM). This number is usually very high (often several thousand MB/s) because it reflects the RAM speed, not the actual disk speed. It shows how fast the CPU can access data already stored in memory.
t: Tests the actual read speed from the disk.
The -t (lowercase t) option is the most important. It measures the sequential read speed directly from the disk, bypassing the system cache. The command reads a significant amount of data multiple times to calculate the average read speed.
/dev/sda
This is the device name of the disk you want to test (typically /dev/sda for the first disk). If you have multiple disks, you can change the device name accordingly, such as /dev/sdb, /dev/nvme0n1, etc.
Distinguishing Cached Reads vs. Buffered Disk Reads
- Cached Reads: This is the speed of reading data from the system’s cache, not directly from the physical disk.
- Buffered Disk Reads: This measures the actual read speed from the physical disk.
Example for Singapore VPS at VPSWindows.com:

Output Analysis:
Timing cached reads: 24690 MB in 1.98 seconds = 12455.38 MB/sec
Cached reads test measures how fast data can be read from system memory (RAM).
Result: 12455.38 MB/sec — This indicates excellent RAM caching performance.
HDIO_DRIVE_CMD(identify) failed: Inappropriate ioctl for device
This warning is normal for virtual disks (like /dev/vda) and can be ignored. It simply means the disk doesn’t support a hardware identify command — common in virtualized environments.
Timing buffered disk reads: 1252 MB in 3.01 seconds = 416.57 MB/sec
Buffered reads test measures how fast data is read directly from the disk (bypassing RAM cache).
Result: 416.57 MB/sec — A solid read speed, typical of SSD-backed VPS.
Common Errors and How to Fix Them When Using the hdparm Command
While using the hdparm command, you may encounter some common issues. Knowing how to resolve these errors will help improve your experience with this tool.
“command not found” Error When Running hdparm
This error occurs when hdparm is not installed on your system. You can fix it by running the command:
sudo apt-get install hdparmIf the installation is successful, you can verify it by typing hdparm -v.
“permission denied” Access Error
This error appears when you lack root permissions to access the disk. To resolve it, make sure you use sudo when running hdparm. For example:
sudo hdparm -t /dev/sdaDisk Device Not Found Error
Sometimes, you might get a message saying the disk device cannot be found.
Possible causes include:
- High system load: Other running applications may interfere.
- Actual disk type: Your VPS might use “virtual SSDs” or outdated SSD technology.
- Provider limitations: Some VPS providers enforce I/O speed limits.
How to fix:
- Try rerunning the command during off-peak hours.
- Check system load with htop or top.
- Contact your VPS provider to ask about the disk type and any I/O limitations.
- Use other tools like fio for more comprehensive testing.
- Use the smartctl command to check the disk’s health and troubleshoot potential issues.
Measuring disk speed on your Ubuntu 20.04 VPS using the hdparm command not only gives you a clear understanding of your system’s storage performance but also plays a crucial role in identifying and addressing potential issues. By using commands like hdparm and carefully analyzing the detailed reports, you can effectively optimize your disk usage. Don’t forget to follow VPSWindows for more in-depth and practical technical guides tailored for VPS and Linux users!