


Have you ever wanted to hide your real IP address or change your virtual location while browsing? Or maybe you just need to manage multiple proxies in one browser without going through complicated settings each time? FoxyProxy Standard is exactly the tool you need for Firefox! In this guide, VPSWidows walks you through how to log in to a proxy on Firefox using FoxyProxy Standard, plus explores its benefits and shows you how to set it up in just a few simple steps.
Overview of FoxyProxy Standard?
What is FoxyProxy Standard?
FoxyProxy Standard is a Firefox add-on that makes managing and using proxies more flexible than ever. Instead of manually configuring proxy settings in the browser’s network options, FoxyProxy lets you create multiple proxy profiles and switch between them with just a few clicks. This makes hiding your IP, changing your virtual location, or accessing geo-restricted websites faster and more convenient than ever.
Benefits of Using FoxyProxy Standard
Once you understand what FoxyProxy Standard is, you’ll probably want to know the benefits it offers, especially when you need to log in to a proxy on Firefox using FoxyProxy Standard. Here are the key advantages this tool brings:
Easily Manage Multiple Proxies: Instead of deleting and adding proxies manually every time you need to switch, FoxyProxy lets you save multiple proxy profiles at once. You can even assign custom names to each proxy, making it easy to identify and switch between them based on your needs. This is especially useful if you work in SEO, digital marketing, or simply use different proxies for various purposes.
Save Time: Manually changing proxies in your browser settings can be time-consuming, especially if you work with multiple IPs. With FoxyProxy, you can enable, disable, or switch proxies right from the Firefox toolbar in just a few clicks, saving you significant time and effort.
Rule-Based Automation: One of FoxyProxy’s standout features is its ability to automatically switch proxies based on rules you set. This not only adds convenience but also helps maximize your privacy.
- URL-Based Management: Configure FoxyProxy to automatically use a specific proxy when visiting certain websites, saving time and boosting security.
- Multi-Purpose Use: Ideal for market research, e-commerce, or any task requiring access to multiple websites with anonymous IP addresses.
Privacy and Anonymity: Using proxies through FoxyProxy hides your real IP address, enhancing your online privacy. This reduces the risk of being tracked, having personal data collected, or falling victim to hacking attempts. It’s also a safer way to browse the internet, especially when connected to public Wi-Fi.
Access Geo-Restricted Content: Some websites or online services only allow access from certain countries. FoxyProxy lets you bypass these geographic restrictions by using proxies from different regions, giving you unrestricted access to online content.
Installing the FoxyProxy Standard Extension
Before you can log in to a proxy on Firefox using FoxyProxy Standard, you’ll need to install the extension. The process is quick and only takes a few minutes.
Step 1: Go to the Firefox Add-ons page
Open your Firefox browser and navigate to the Add-ons Manager by typing about:addons into the address bar, or click the three horizontal lines in the top-right corner and select “Add-ons and Themes.”
Step 2: Search for FoxyProxy Standard
In the Add-ons Manager, you’ll see a search bar. Type “FoxyProxy Standard” into it and press Enter. Firefox will display the search results with the matching extension.
Step 3: Add to Firefox
Once you’ve found FoxyProxy Standard, click the “Add to Firefox” button. A pop-up window will appear asking for permission to access certain browser functions. Review the details, then click “Add” to complete the installation. After the installation is successful, the FoxyProxy Standard icon will appear in the top-right corner of your browser.

Configuring a Proxy in FoxyProxy Standard
Once FoxyProxy is successfully installed, the next step is to configure your proxy. This is the most important step for logging in to a Proxy on Firefox using FoxyProxy Standard.
Step 1: Open FoxyProxy Settings
To configure a proxy, first open the FoxyProxy settings:
- Click the FoxyProxy Standard icon on Firefox’s toolbar.
- A small menu will appear; select “Options” to open the detailed settings page. Here, you’ll see the FoxyProxy configuration interface.
Step 2: Add a New Proxy
To add a new proxy:
- In the configuration interface, click the “Add” button.
- A new window will pop up asking for your proxy details.
Step 3: Enter Proxy Information
Fill in the required details for the proxy you want to use:
- Proxy Type: Choose the type of proxy you need (e.g., HTTP or SOCKS5).
- Proxy IP Address: Enter the proxy’s IP address.
- Port: Enter the port number used by the proxy.
- Title: Give your proxy a descriptive name to help you identify it later, such as “Work Proxy,” “Singapore Proxy”, or “Anonymous Proxy.” This is especially useful if you manage multiple proxies.
- Authentication (optional): If your proxy requires a username and password, check the “Username” and “Password” fields and enter your login credentials.
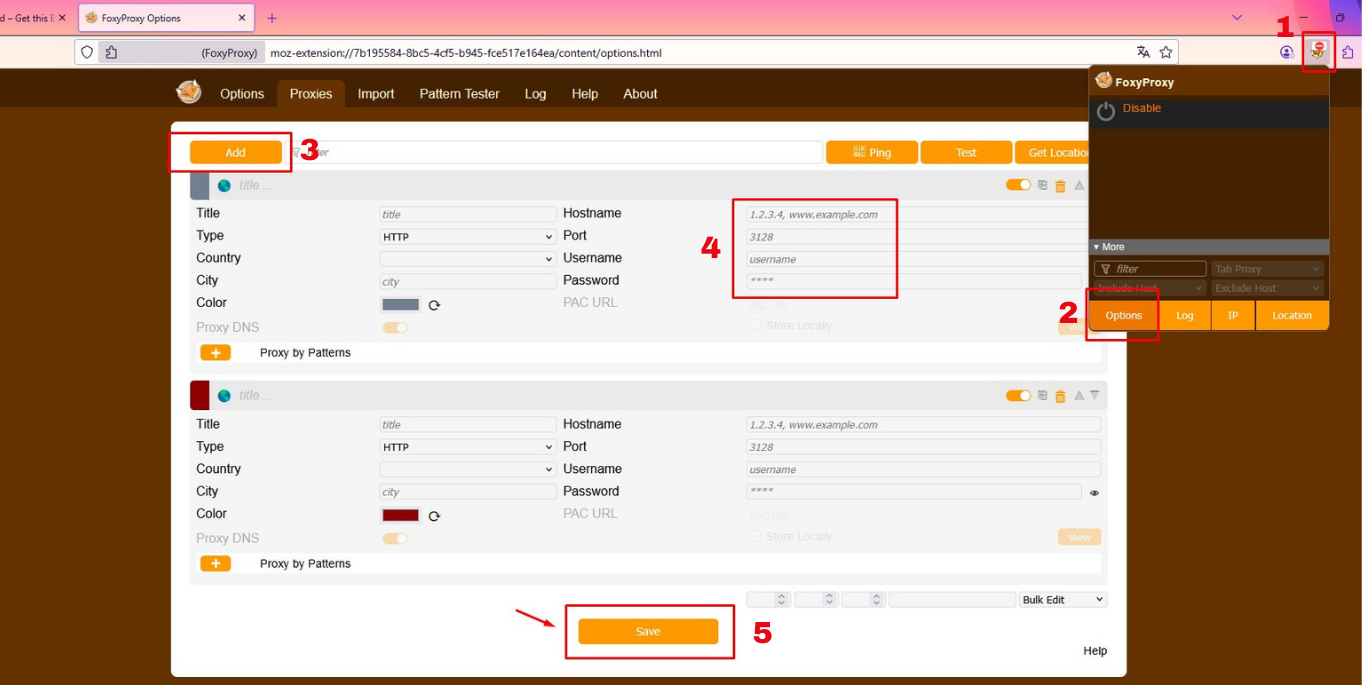
Step 4: Save Your Configuration
Once you’ve entered all the necessary details:
- Click “Save” to store the settings.
- The system will return to the main interface, where you can manage your proxies or start using them immediately.
Now, your proxy is fully set up, and you’re ready to log in to a Proxy on Firefox using FoxyProxy Standard and use it.
Activating and Using a Proxy
Once your proxy is configured, using it becomes extremely simple. Here’s how you can log in to a Proxy on Firefox using FoxyProxy Standard in your daily workflow.
Step 1: Select Your Configured Proxy
To enable the proxy you’ve just added:
Click the FoxyProxy Standard icon in the Firefox toolbar. From the dropdown list, select the name of the proxy you want to use. Your browser’s connection settings will instantly switch to the chosen proxy.
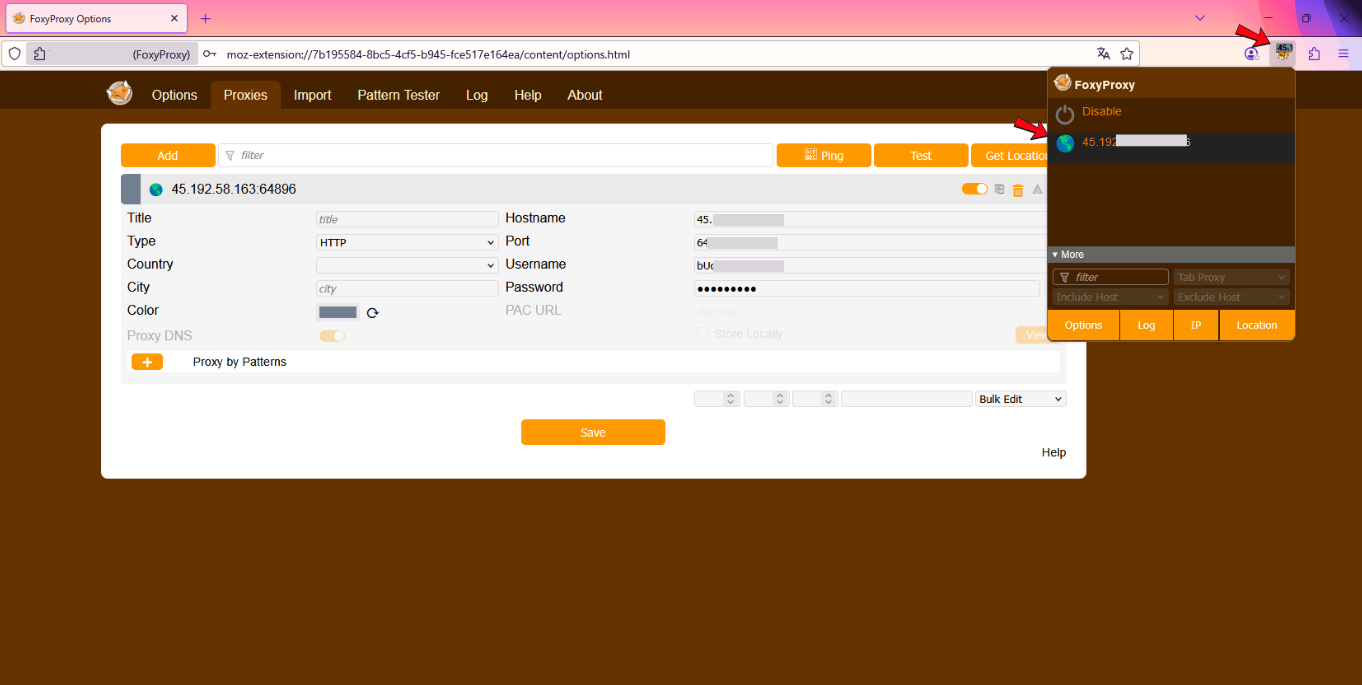
Step 2: Choose the Operating Mode (Optional)
FoxyProxy offers several modes to control how your proxy is used:
- Use proxies based on their settings (by pattern matching): An automated mode where FoxyProxy switches proxies based on the rules you’ve set.
- Totally disable FoxyProxy: Turns off all proxy usage.
- Use [Your Proxy Name]: Forces Firefox to use a specific proxy for all websites; this is the most common mode when you manually log in to a Proxy on Firefox using FoxyProxy Standard. Just click the name of the proxy you want, and Firefox will immediately start routing your browsing through it. This makes it easy to switch between multiple proxies and browse securely or access region-restricted content.
Checking Your Proxy
After you log in to a Proxy on Firefox using FoxyProxy Standard, it’s a good idea to verify that everything is working as expected.
Step 1: Visit an IP Checking Website
To confirm your current IP address:
- Open a new tab in Firefox.
- Go to an IP checking website such as checkproxy.org. The site will display the public IP address your browser is currently using.
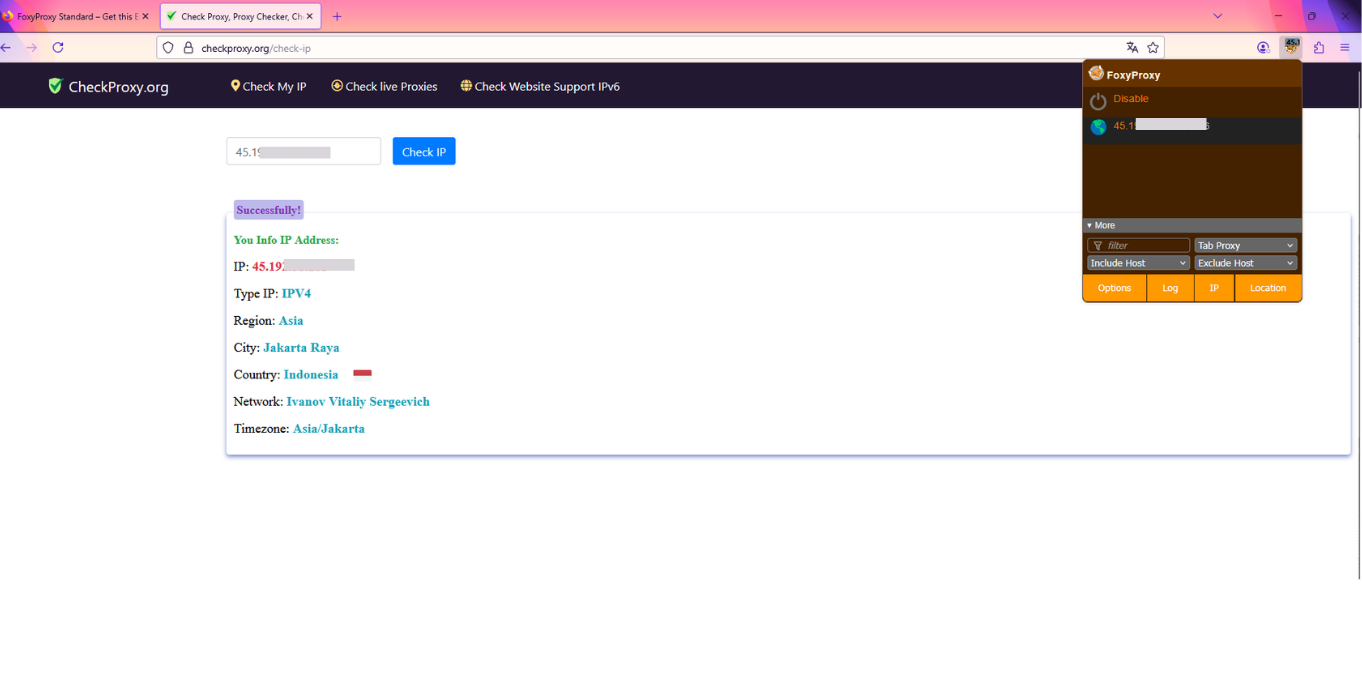
Step 2: Verify the IP Address
- If the IP address shown matches the proxy IP you configured, you’ve successfully logged into a proxy on Firefox using FoxyProxy Standard.
- If the site still shows your real IP, go back and review your configuration steps. Small mistakes, such as entering the wrong IP or port, can prevent the proxy from working correctly.
Always double-check your settings to ensure a smooth and secure proxy login experience on Firefox with FoxyProxy Standard.
FoxyProxy Standard is truly an essential tool for optimizing proxy login on Firefox in a simple and efficient way. With the instructions above, we hope you’re now confident in using this tool. For more high-quality proxy options tailored to your needs, visit our website. VPSWindows are always ready to support you and accompany you on every step of your online journey.