


In the digital age, proxies are valuable tools that help users hide their IP addresses, protect personal information, and access restricted content. To use proxies effectively on the Chrome browser, the Simple Proxy Switcher extension is a popular, easy-to-use choice. In this article, VPSWindows will guide you step by step on how to install and log in to a proxy on Chrome using the Simple Proxy Switcher extension, ensuring that anyone can follow along with ease.
What is the Proxy?
A proxy is an intermediary server between you and the Internet. Instead of connecting directly from your device to a target website, your data passes through the proxy server before reaching the destination. This means your real IP address is not directly exposed to the websites you visit, enhancing anonymity and security.
Here are some key features and benefits of using a proxy:
- Privacy protection: By masking your real IP address, a proxy helps safeguard your personal information and browsing behavior from being tracked by third parties.
- Access to restricted content: Proxies allow users to bypass geo-blocks and access content that may be unavailable in certain regions, such as region-locked streaming services.
- Improved internet speed: Some types of proxies can optimize data routing, resulting in faster loading times and improved browsing performance.
- Easy to manage: Proxy settings are generally lightweight and user-friendly, making it easy to switch between different proxy configurations.
Simple Proxy Switcher: A Must-Have Extension for Chrome
What is Simple Proxy Switcher?
Simple Proxy Switcher is a free extension designed specifically for Google Chrome. As its name suggests, it helps you switch proxies easily, quickly, and conveniently. You no longer have to dig through complex browser settings every time you want to change your IP address. With a user-friendly and intuitive interface, Simple Proxy Switcher allows you to add, save, and activate proxy configurations with just a few clicks. It’s a great tool for both beginners and more advanced users who want a smoother browsing experience.
Why Choose Simple Proxy Switcher?
In a world that’s increasingly connected to the internet, choosing the right tool to protect your personal information is more important than ever. Simple Proxy Switcher stands out as an ideal choice with several key benefits:
- Intuitive and Easy-to-Use Interface: When you launch Simple Proxy Switcher, you’ll find a clean and user-friendly interface. The settings are well-organized, making it easy to find and use all the features, even if it’s your first time. Beginners won’t need to spend much time learning how it works.
- Store Multiple Proxy Profiles: One of the standout features of Simple Proxy Switcher is its ability to save multiple proxy configurations. You can store different proxies for various tasks, which is especially handy if you manage multiple accounts or regularly access geo-restricted content.
- Supports Multiple Protocols: Simple Proxy Switcher supports various protocols to suit your needs. Popular options like HTTP, HTTPS, and SOCKS ensure both flexibility and enhanced privacy. This feature helps protect your data while browsing, keeping you safe from third-party threats.
- Quick Enable/Disable Function: A favorite among users is the one-click activation or deactivation of proxies. You can easily switch between proxy settings without digging through complex menus, saving time and streamlining your workflow.
How to Install Simple Proxy Switcher on Chrome
To log in to a proxy on Chrome using the Simple Proxy Switcher extension quickly and effectively, the first step is to install the tool itself. Installing Simple Proxy Switcher is easy and only takes a few clicks.
Step 1 – Open Chrome and Go to the Chrome Web Store
First, open the Google Chrome browser on your computer. There are two simple ways to access the Chrome Web Store:
- Option 1 (Fastest): Type chrome.google.com/webstore directly into the address bar and hit Enter.
- Option 2: Click the three-dot menu in the top-right corner of your browser, choose “Extensions”, then click “Visit Chrome Web Store.”
Step 2: Search for the “Simple Proxy Switcher” extension and add it to Chrome
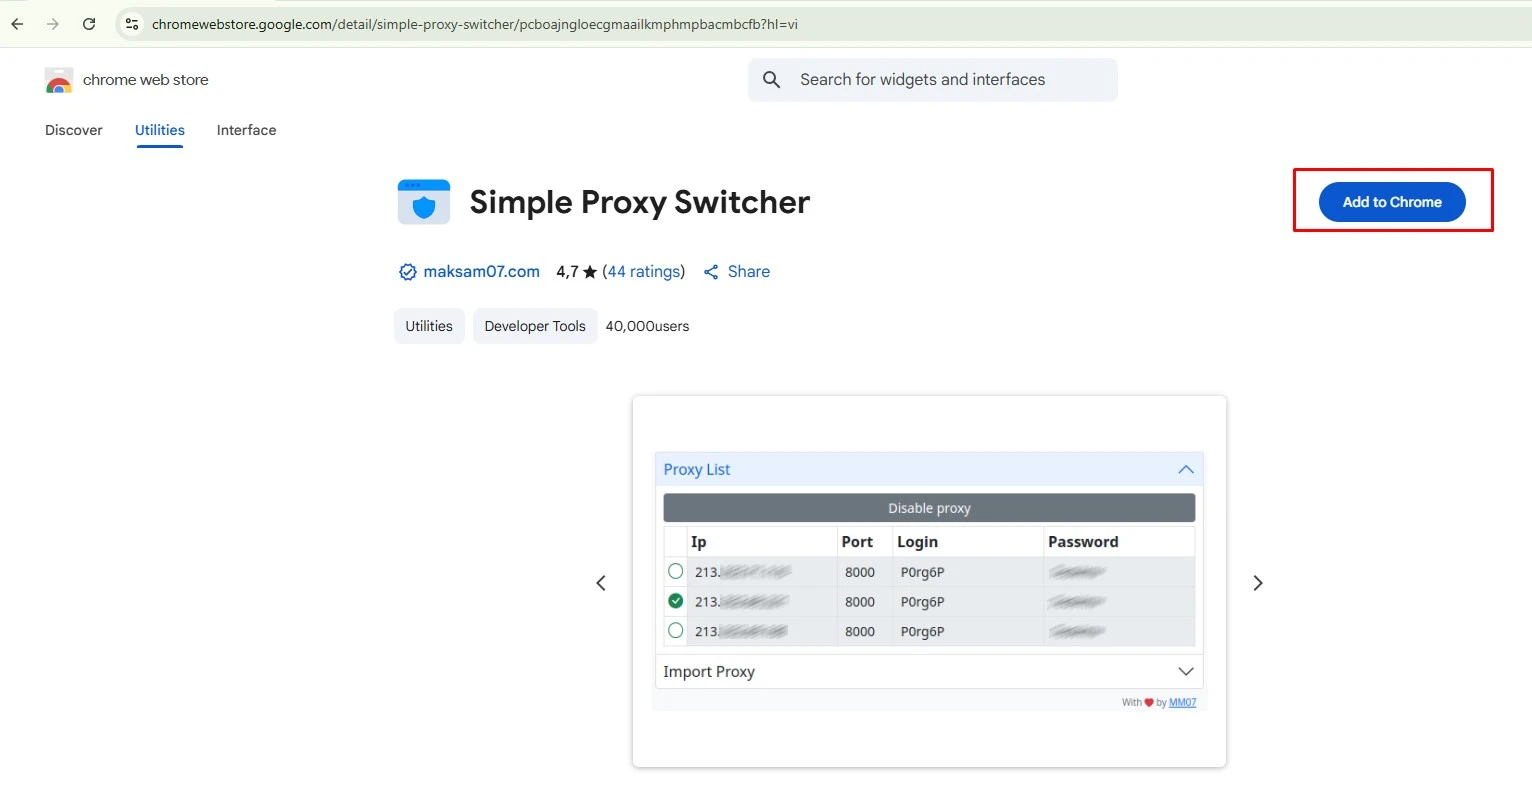
Once you’re in the Chrome Web Store, you’ll see a search bar in the top-left corner. Type the exact keyword “Simple Proxy Switcher” into the search box and press Enter.
The search results will show the extension. Look for the one with the arrow icon. Then, click the “Add to Chrome” button. A small confirmation dialog will appear; just click “Add extension” to complete the installation.
Note: You can pin the extension to the toolbar for quicker access whenever you need it.
How to Log In to a Proxy on Chrome Using the Simple Proxy Switcher Extension
Logging into a proxy via Simple Proxy Switcher after installation is quick and straightforward. Below is a step-by-step guide on how to log in to a proxy on Chrome using the Simple Proxy Switcher extension.
Step 1: Open the Simple Proxy Switcher Interface
To open the Simple Proxy Switcher interface, simply click on its icon in the Chrome toolbar. The main window will appear, allowing you to quickly start configuring your proxy settings as desired. The interface is very intuitive, with various options that make it easy to create and manage proxy profiles without any hassle.
Step 2: Add a New Proxy
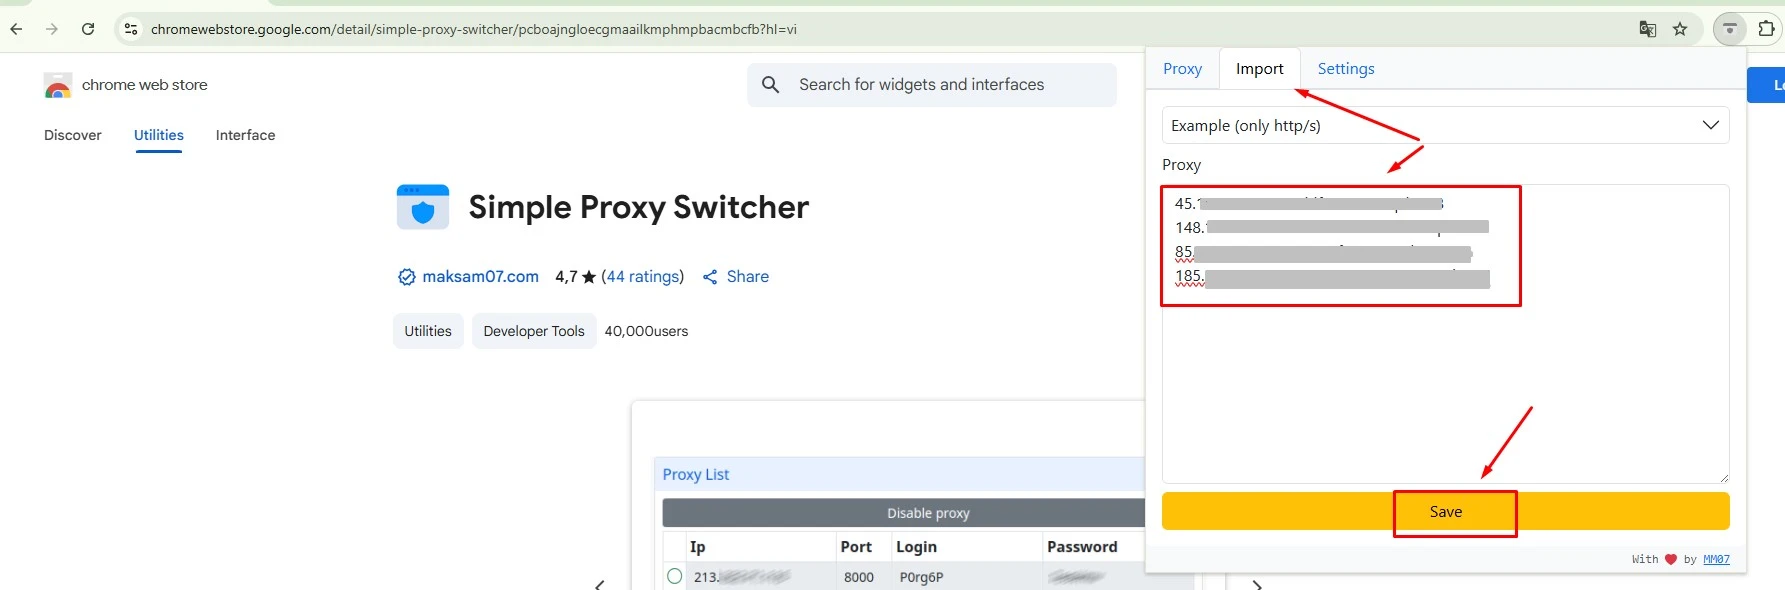
In the Simple Proxy Switcher interface window, you will see a list (which may be empty if this is your first time using it) along with some options. To add a new proxy configuration to the list, look for and click the “Import”. Once clicked, a small form will appear for you to enter the proxy details.
Step 3: Enter Your Proxy Information
After clicking “Import” a form will appear where you need to enter the necessary details to connect to the proxy. The required information includes:
- Proxy IP address.
- Port number.
- Username and password (if any): If the proxy requires authentication, you’ll need to enter the correct login credentials.
Fill in all the fields accordingly and click “Save” to confirm. Entering accurate information is crucial to ensure a successful connection to the proxy.
Step 5: Activate the Proxy to Start Using it
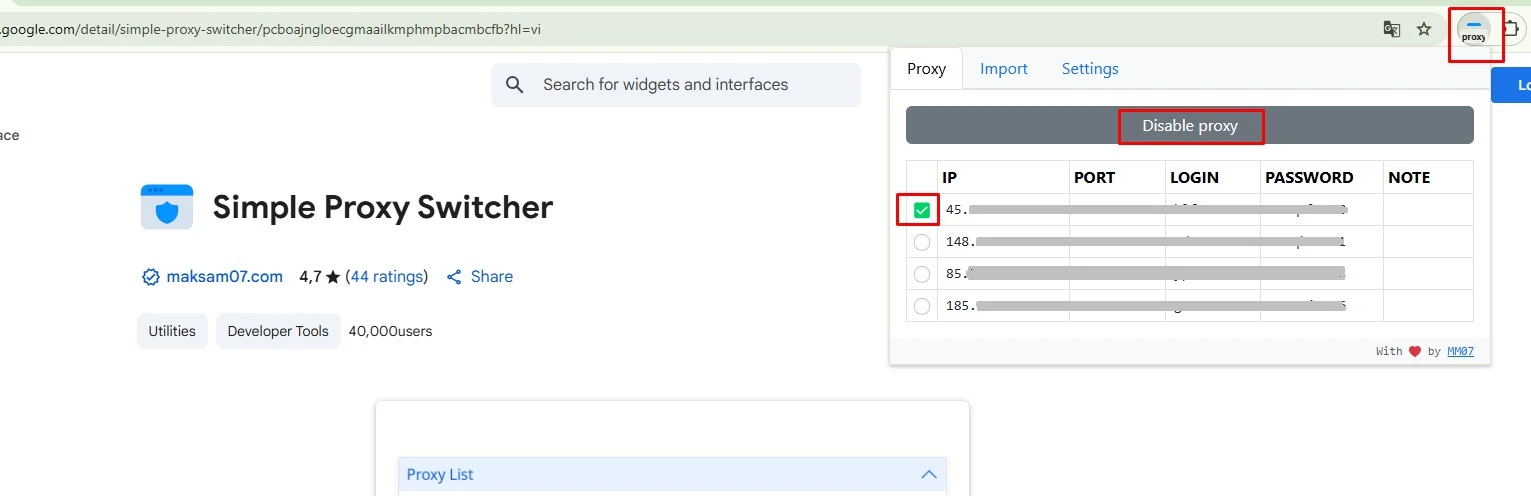
To begin using the proxy you just configured, you need to activate it. Open Simple Proxy Switcher, and you’ll see a list of all saved proxy profiles. Select the one you want to use by clicking on the corresponding option. The extension will immediately apply the settings and connect to the selected proxy. A confirmation message will appear in the interface to indicate that the proxy has been activated.
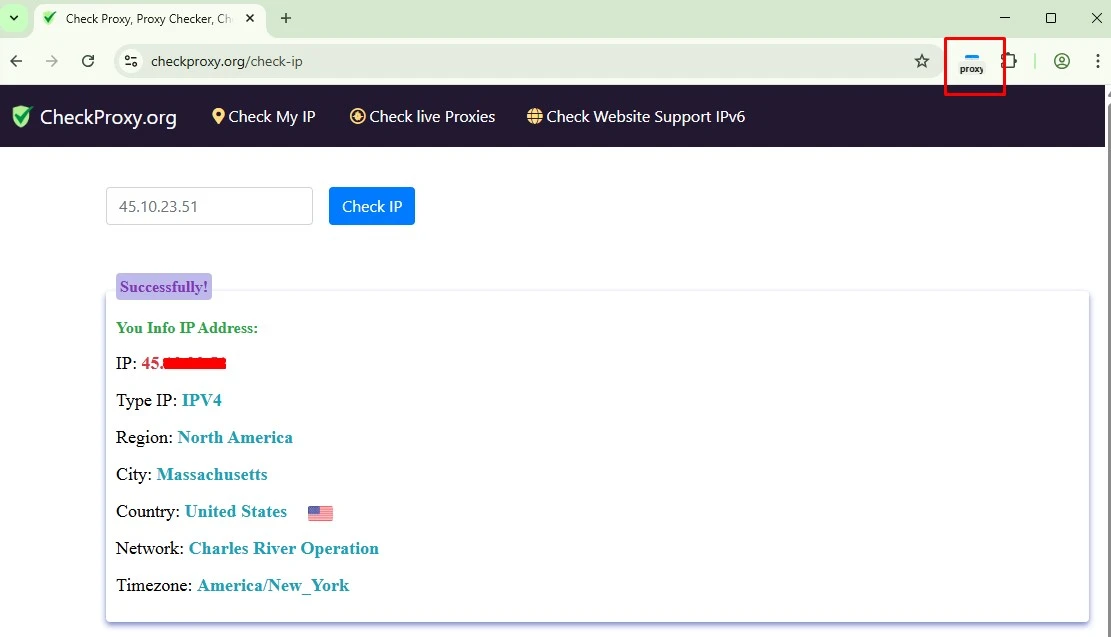
Step 6: Verify Your Current IP Address
After activating the proxy, it’s important to check your current IP address to confirm that the proxy is working. Open a new tab in Chrome and visit an IP-checking website such as checkproxy.org or whatismyip.com. These sites will display your current IP address. If the displayed IP address is different from your original one (the one you saw before enabling the proxy), it means the proxy connection is working successfully.
Using Simple Proxy Switcher not only makes it easier to manage multiple proxy configurations, but also helps save time and enhance online security. Through this guide on How to Log in to a Proxy on Chrome Using the Simple Proxy Switcher Extension, we hope you’ve gained a clear understanding of how to set up and use a proxy via this useful tool. Using a proxy not only protects your privacy but also allows you to access geo-restricted content. Just make sure to use reliable proxy servers and stay cautious of potential online risks at all times.
If you’re interested in protecting your personal information and staying safe online, explore proxy services and how to use them to enjoy a more secure internet experience! VPSWindows is a trusted provider of high-quality proxy services, offering a variety of plans tailored to suit different user needs. We are committed to delivering the best service experience possible. If you have any questions or need assistance, please don’t hesitate to contact the VPSWindows customer support team for prompt help.